
You have no items in your shopping cart.
Protocol Optimization & Best Practices
Western Blot Tips and Tricks
Practical strategies to maximize signal-to-noise ratio, eliminate non-specific bands, and produce publication-ready blots.
Western Blotting (immunoblotting) is a core analytical technique used to detect and quantify specific proteins within complex cell lysates or tissue extracts. Target proteins are separated by molecular weight via gel electrophoresis, transferred to a membrane, and probed using specific primary and secondary antibodies.
Achieving clear, reproducible blots requires maximizing your assay's signal-to-noise ratio—maximizing target band intensity while eliminating background haze, non-specific cross-reactivity, and artifacts.
Official Western Blot Protocol
Looking for exact buffer formulations, SDS-PAGE gel recipes, and step-by-step bench instructions? Access Biorbyt's SDS-PAGE & Western Blot Protocol Guide.
1. Western Blot Workflow Overview
A standard Western Blotting experiment follows six fundamental sequential stages:
- 1. Protein Extraction: Lysis of cell or tissue samples in buffer containing protease and phosphatase inhibitors.
- 2. Gel Electrophoresis: Separation of denatured proteins by molecular weight using SDS-PAGE.
- 3. Electrotransfer: Transfer of separated protein bands from polyacrylamide gel onto a PVDF or nitrocellulose membrane.
- 4. Blocking: Saturation of unreacted membrane binding sites to prevent non-specific antibody adsorption.
- 5. Antibody Incubations: Sequential binding of target-specific primary antibody and conjugated secondary antibody.
- 6. Detection & Imaging: Signal visualization using chemiluminescent (ECL) or fluorescent substrate detection.
2. Ten Essential Western Blot Optimization Tips
Antibody Selection & Concentration Titration
Select primary antibodies specifically validated for Western Blotting (WB). Establish optimal working dilutions by titrating the primary antibody across a recommended range (e.g., 1:500 to 1:2000). For chemiluminescent (ECL) detection, titrating secondary HRP-conjugated antibodies is equally critical; excessive secondary antibody causes high background membrane haze or rapid substrate depletion (ghost bands).
Need help selecting a secondary antibody? Try Biorbyt's guide to Choosing the Best Secondary Antibody.
Cold Lysate Extraction & Protease Inhibition
Keep tissue culture dishes, cell pellets, and lysis buffers chilled on ice (4°C) throughout extraction to prevent rapid enzymatic degradation. Always supplement lysis buffers (e.g., RIPA) with a fresh cocktail of protease and phosphatase inhibitors.
Accurate Protein Quantification & Equal Loading
Quantify lysate protein concentrations using a Bradford, BCA, or Lowry assay prior to gel loading. Load uniform protein amounts across all lanes (typically 20–40 μg per lane). Equalize total sample volumes across empty and active lanes using 1X loading buffer to prevent uneven lane spreading during electrophoresis.
Polyacrylamide Gel Casting Best Practices
Select the appropriate acrylamide percentage (7%–15%) based on target protein molecular weight. Add ammonium persulfate (10% APS) and TEMED last during gel preparation to control polymerization. Remove water overlays completely using filter paper before pouring the stacking gel, and keep a spare tube of gel solution to monitor polymerization status.
Electrophoresis Run Conditions
Submerge gels completely in 1X running buffer. Verify power supply electrode polarity (Red to Red, Black to Black). Run stacking gels at lower voltage (~80 V) to compress sample bands into narrow lines before increasing voltage (~120 V) for resolving separation.
Membrane Selection & Transfer Optimization
Choose PVDF (polyvinylidene fluoride) membranes for high mechanical strength, target retention, and re-probing/stripping capability (pre-wet PVDF in 100% methanol before equilibration). Choose Nitrocellulose for low background in standard single-use blots. Keep transfer cassettes submerged in cold transfer buffer on ice (4°C) to prevent thermal gel distortion, and ensure the membrane faces the positive anode.
Membrane Blocking Strategy
Block membranes for 1 hour at room temperature using 5% non-fat dry milk or 5% Bovine Serum Albumin (BSA) in TBST. Avoid milk-based blocking buffers when detecting phosphorylated targets or using biotin-streptavidin systems, as milk contains endogenous phosphoproteins and biotin that increase background noise.
Primary & Secondary Antibody Incubation
Incubate primary antibodies diluted in 5% BSA or milk-TBST overnight (12–16 hours) at 4°C with gentle orbital shaking for maximum target binding. Incubate secondary antibodies (diluted 1:2,000 to 1:10,000) for 1 hour at room temperature.
Thorough Agitated Wash Cycles
Wash membranes on an orbital shaker at least 3 to 4 times for 5–10 minutes each using TBST (Tris-Buffered Saline with 0.05%–0.1% Tween-20). If background remains high, slightly increase the Tween-20 concentration (up to 0.1%) or extend wash durations to remove non-specifically bound antibodies.
ECL Visualization & Exposure Range
Coat membranes completely with fresh Enhanced Chemiluminescence (ECL) substrate mix for 1–2 minutes before imaging. Capture images across a series of exposure times (from 10 seconds to several minutes) using a digital CCD imager or X-ray film to identify optimal target signal within the linear dynamic range without saturating pixels.
3. Validated Western Blot Gallery
Examples of clean, specific target detection using Biorbyt primary antibodies across multi-tissue panels:
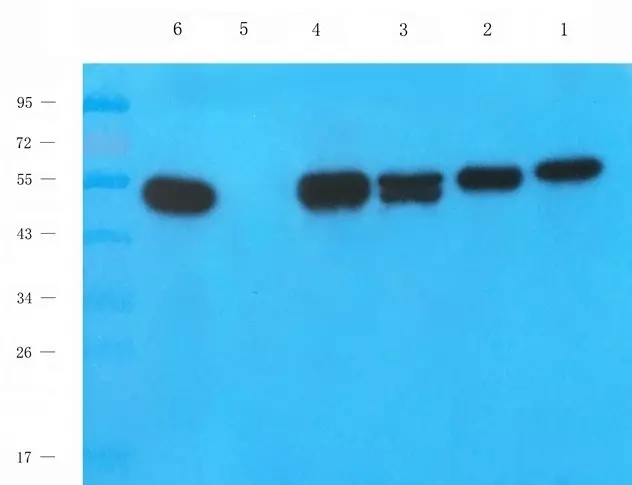
WB analysis of rat heart (lane 1), mouse stomach (lane 2), rat liver (3), rat spleen (4), rat lung (5), human breast cancer (6) using anti-MLKL antibody (orb32399, 1 μg/ml).
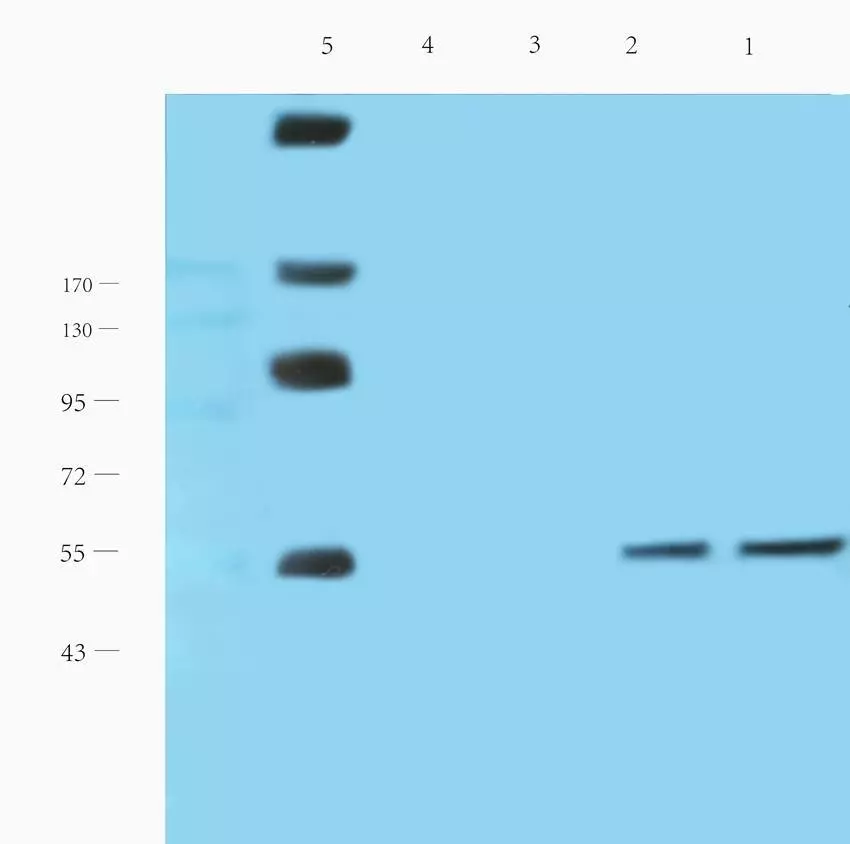
WB analysis of rat lymph node (lane 1), rat spleen (2), rat lung (3), mouse brain (4), human breast cancer (5), human ovarian cancer (6) using anti-CD19 antibody (orb10306, 1 μg/ml).
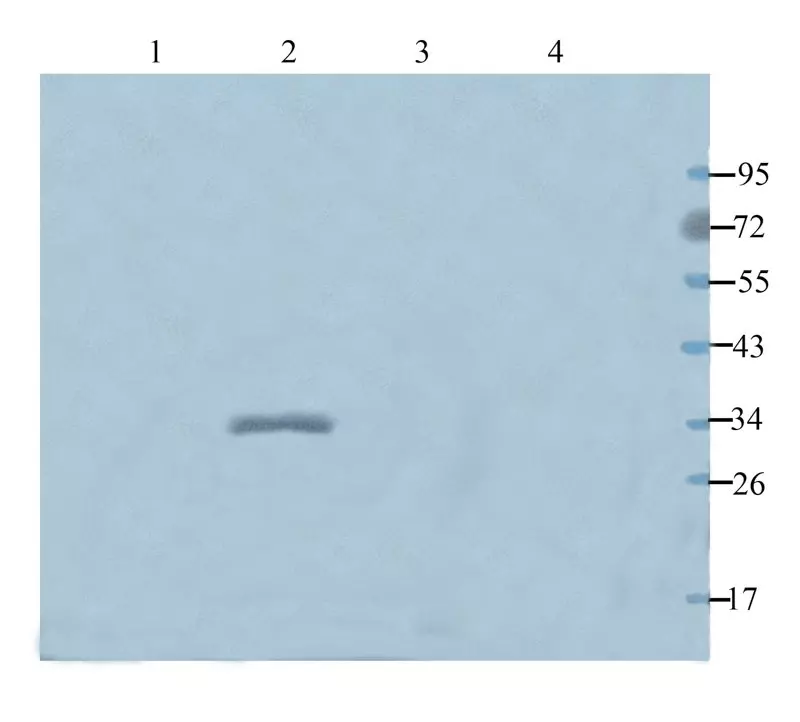
WB analysis of rat brain (lane 1), mouse stomach (2), rat kidney (3), mouse lung (4) using anti-Filaggrin antibody (orb10662, 1 μg/ml).
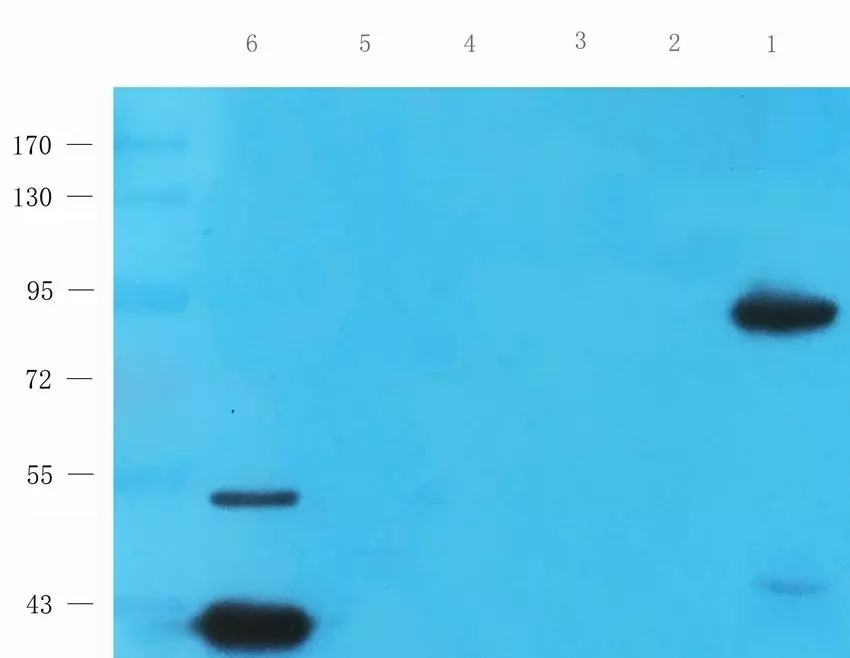
WB analysis of rat heart (lane 1), mouse skeletal muscle (2), rat testis (3), mouse colon (4), rat thymus (5), mouse liver (6) using anti-PGC1 alpha antibody (orb13647, 0.5 μg/ml).
Need Guidance on Western Blot Optimization?
Biorbyt’s scientific support team is available to assist you with primary antibody selection, dilution titration, and troubleshooting high background signal.
Contact Technical Support